Home >> Celebrations, Christmas >> DIY paper plate snowman
DIY paper plate snowman
Materials:
- 3 paper plates
- Orange and black craft paper
- Pipe cleaners
- Soft craft balls
- Old piece of material for scarf
- Scissors
- Craft glue and glue gun
Method:
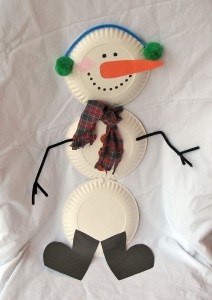
1. Using the image on the right as a guide, stick each paper plate one on top of the other and use your glue gun to hold in place. Set aside to dry.
2. Shape some black pipe cleaners into arms, twisting fingers on to each arm. Then using a pipe cleaner in a colour of your choice, create some ear muffs for your snowman using the glue gun to stick the soft craft balls onto each end of the pipe cleaner.
3. Cut out small black circles for your snowman’s eyes and mouth, a long orange triangle for your snowman’s mouth and if you wish 2 large black boots.
4. Stick the features you created in steps 2 and 3 onto the snowman using the glue gun for the ear muffs and arms and craft glue for your snowman’s face and boots.
5. Tie your piece of material into a knot so that it looks like a scarf and then using your glue gun stick it onto your snowman.
6. To display your snowman you can either put it up onto a wall using pins, glu-tac or a staple gun or you can hang it up using clear fishing line which you will loop through hole punches in the top of your snowman’s head.
See more DIY Christmas Decorations
Tags: celebrations, Christmas, Christmas decorations, DIY, DIY Christmas decorations, DIY snowmen, holiday decorations, holidays, paperplate snowmen, pregnancy, pregnant
